Ecobee Driver
The Ecobee driver is an implementation of a VOLTTRON driver framework Interface. In this case, the Platform Driver issues commands to the Ecobee driver to collect data from and send control signals to Ecobee’s remote web API
Note
Reading the driver framework and driver configuration documentation prior to following this guide will help the user to understand drivers, driver communication, and driver configuration files.
This guide covers:
Creating an Ecobee application via the web interface
Creating an Ecobee driver configuration file, including finding the user’s Ecobee API key and Ecobee thermostat serial number
Creating an Ecobee registry configuration file
Installing the Platform Driver and loading Ecobee driver and registry configurations
Starting the driver and viewing Ecobee data publishes
Ecobee Application
Connecting the Ecobee driver to the Ecobee API requires configuring your account with an Ecobee application.
Log into the Ecobee site
Click on the “hamburger” icon on the right to open the account menu, then click “Developer”

On the bottom-left corner of the screen that appears, click “Create New”

Fill out the name, summary, and description forms as desired. Click “Authorization Method” and from the drop-down that appears, select “ecobee PIN” (this will enable an extra layer of authentication to protect your account)
Record the API key for the Application from the Developer menu
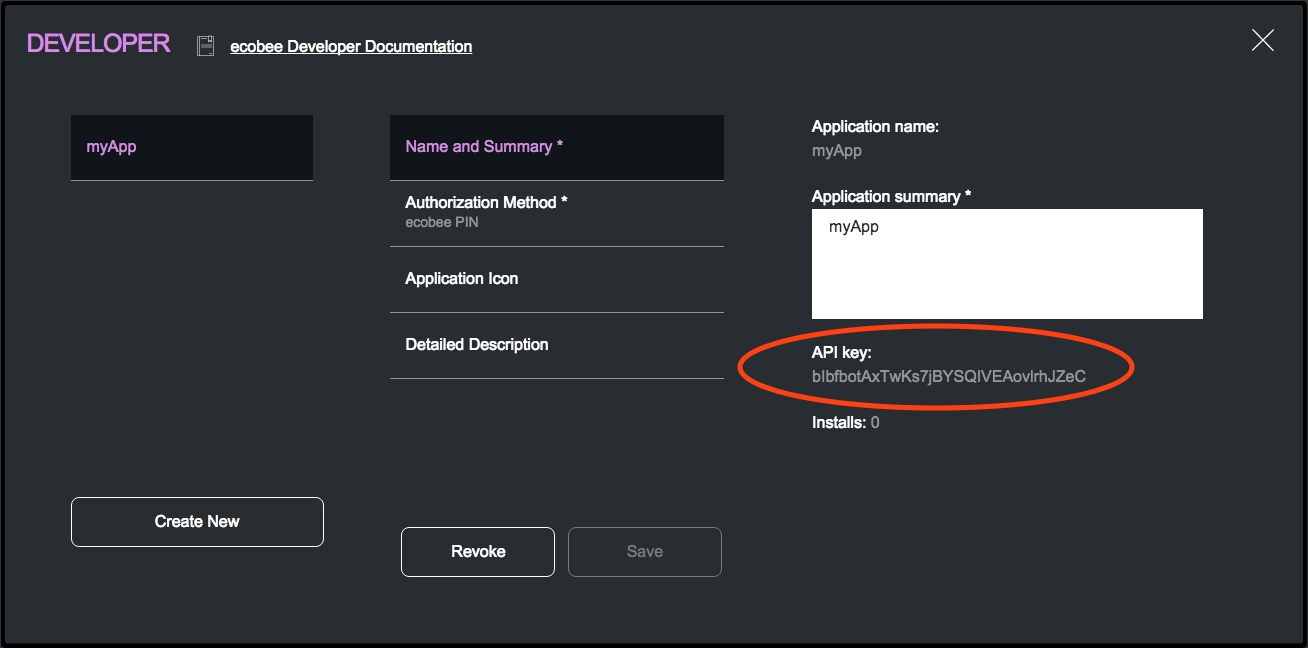
From Ecobee authenication docs
Configuration Files
The Ecobee driver uses two configuration files, a driver configuration which sets the parameters of the behavior of the driver, and registry configuration which instructs the driver on how to interact with each point.
This is an example driver configuration:
{
    "driver_config": {
        "API_KEY": "abc123",
        "DEVICE_ID": 8675309
    },
    "driver_type": "ecobee",
    "registry_config":"config://campus/building/ecobee.csv",
    "interval": 180,
    "timezone": "UTC"
}
The driver configuration works as follows:
Config Field |
Description |
|---|---|
driver_config |
This section specifies values used by the driver agent during operation |
API_KEY |
This is the User’s API key. This must be obtained by the user from the Ecobee web UI and provided in this part of the configuration. Notes on how to do this will be provided below |
DEVICE_ID |
This is the device number of the Ecobee thermostat the driver is responsible for operating. This must be obtained by the user from the Ecobee web UI. Notes on how to do this will be provided below |
driver_type |
This value should match the name of the python file which contains the interface class implementation for the Ecobee driver and should not change |
registry_config |
This should a user specified path of the form “config://<path>. It is recommended to use the device topic string following “devices” with the file extension (“config://<campus>/<building?/ecobee.csv”) to help the user keep track of configuration pairs in the store. This value must be used when storing the config (see installation step below) |
interval |
This should specify the time in seconds between publishes to the message bus by the Platform Driver for the Ecobee driver (Note: the user can specify an interval for the Ecobee driver which is shorter than 180 seconds, however Ecobee API data is only updated at 180 second intervals, so old data will be published if a scrape occurs between updates.) |
timezone |
Timezone to use for publishing timestamps. This value should match the timezone from the Ecobee device |
Note
Values for API_KEY and DEVICE_ID must be obtained by the user. DEVICE_ID should be added as an integer representation of the thermostat’s serial number.
Getting API Key
Ecobee API keys require configuring an application using the Ecobee web UI. For more information on configuring an application and obtaining the API key, please refer to the Ecobee Application heading in this documentation.
Finding Device Identifier
To find your Ecobee thermostat’s device identifier:
Log into the Ecobee customer portal
From the Home screen click “About My Ecobee”
The thermostat identifier is the serial number listed on the About screen
Registry Configuration
This file specifies how data is read from Ecobee API response data as well as how points are set via the Platform Driver and actuator.
It is likely that more points may be added to obtain additional data, but barring implementation changes by Ecobee it is unlikely that the values in this configuration will need to change substantially, as most thermostats provide the same range of data in a similar format.
This is an example registry configuration:
Point Name |
Volttron Point Name |
Units |
Type |
Writeable |
Readble |
Default Value |
Notes |
|---|---|---|---|---|---|---|---|
fanMinOnTime |
fanMinOnTime |
seconds |
setting |
True |
True |
||
hvacMode |
hvacMode |
seconds |
setting |
True |
True |
||
humidity |
humidity |
% |
setting |
False |
True |
||
coolHoldTemp |
coolHoldTemp |
degF |
hold |
True |
False |
||
heatHoldTemp |
heatHoldTemp |
degf |
hold |
True |
False |
||
actualTemperature |
ActualTemperature |
degF |
hold |
False |
True |
This configuration works as follows:
Config Field |
Description |
|---|---|
Point Name |
Name of a point as it appears in Ecobee response data (example below) |
Volttron Point Name |
Name of a point as a user would like it to be displayed in data publishes to the message bus |
Units |
Unit of measurement specified by remote API |
Type |
The Ecobee driver registry configuration supports ‘setting’ and ‘hold’ register types, based on how the data is represented in Ecobee response data (example below) |
Writable |
Whether or not the point is able to be written to. This may be determined by what Ecobee allows, and by the operation of Ecobee’s API (to set an Ecobee cool/heat hold, cool/HoldTemp is used, but to read other data points are used and therefore are not writable; this is a quirk of Ecobee’s API) |
Readable |
Whether or not the point is able to be read as specified. This may be determined by what Ecobee allows, and by the operation of Ecobee’s API (to set an Ecobee cool/heat hold, cool/HoldTemp is used, however the requested hold values are represented as desiredCool/Heat in Ecobee’s response data; this is a quirk of Ecobee’s API) |
Default Value |
Used to send device defaults to the Ecobee API, this is optional |
Notes |
Any user specified notes, this is optional |
An example registry configuration containing all points from the development device is available in the examples/configurations/drivers/ecobee.csv file in the VOLTTRON repository.
For additional explanation on the quirks of Ecobee’s readable/writable points, visit: https://www.ecobee.com/home/developer/api/documentation/v1/functions/SetHold.shtml
Installation
The following instructions make up the minimal steps required to set up an instance of the Ecobee driver on the VOLTTRON platform and connect it to the Ecobee remote API:
Create a directory using the path $VOLTTRON_ROOT/configs and create two files, ecobee.csv and ecobee.config. Copy the registry config to the ecobee.csv file and the driver config to the ecobee.config file. Modify the API_KEY and DEVICE_ID fields from the driver config with your own API key and device serial number.
If the platform has not been started:
./start-volttron
Be sure that the environment has been activated - you should see (volttron) next to <user>@<host> in your terminal window. To activate an environment, use the following command.
source env/bin/activate
Install a Platform Driver if one is not yet installed
python scripts/install-agent.py --agent-source services/core/PlatformDriverAgent --config \
examples/configurations/drivers/platform-driver.agent --tag platform.driver
Load the driver configuration into the configuration store (“vctl config list platform.driver” can be used to show installed configurations)
vctl config store platform.driver devices/campus/building/ecobee $VOLTTRON_ROOT/configs/ecobee.config
Load the driver’s registry configuration into the configuration store
vctl config store platform.driver campus/building/ecobee.csv $VOLTTRON_ROOT/configs/ecobee.csv --csv
Start the platform driver
vctl start platform.driver
At this point, the platform driver will start, configure the driver agent, and data should start to publish on the publish interval.
Note
If starting the driver for the first time, or if the authorization which is managed by the driver is out of date, the driver will perform some additional setup internally to authenticate the driver with the Ecobee API. This stage will require the user enter a pin provided in the volttron.log file to the Ecobee web UI. The Ecobee driver has a wait period of 60 seconds to allow users to enter the pin code into the Ecobee UI. Instructions for pin verification follow.
PIN Verification steps:
Obtain the pin from the VOLTTRON logs. The pin is a 4 character long string in the logs flanked by 2 rows of asterisks

Log into the Ecobee UI . After logging in, the customer dashboard will be brought up, which features a series of panels (where the serial number was found for device configuration) and a “hamburger” menu.

Add the application: Click the “hamburger” icon which will display a list of items in a panel that becomes visible on the right. Click “My Apps”, then “Add application”. A text form will appear, enter the pin provided in VOLTTRON logs here, then click “validate” and “add application.

This will complete the pin verification step.
Ecobee Driver Usage
At the configured interval, the platform driver will publish a JSON object with data obtained from Ecobee based on the provided configuration files.
To view the publishes in the volttron.log file, install and start a ListenerAgent:
python scripts/install-agent.py -s examples/ListenerAgent
The following is an example publish:
'Status': [''],
  'Vacations': [{'coolHoldTemp': 780,
                 'coolRelativeTemp': 0,
                 'drRampUpTemp': 0,
                 'drRampUpTime': 3600,
                 'dutyCyclePercentage': 255,
                 'endDate': '2020-03-29',
                 'endTime': '08:00:00',
                 'fan': 'auto',
                 'fanMinOnTime': 0,
                 'heatHoldTemp': 660,
                 'heatRelativeTemp': 0,
                 'holdClimateRef': '',
                 'isCoolOff': False,
                 'isHeatOff': False,
                 'isOccupied': False,
                 'isOptional': True,
                 'isTemperatureAbsolute': True,
                 'isTemperatureRelative': False,
                 'linkRef': '',
                 'name': 'Skiing',
                 'occupiedSensorActive': False,
                 'running': False,
                 'startDate': '2020-03-15',
                 'startTime': '20:00:00',
                 'type': 'vacation',
                 'unoccupiedSensorActive': False,
                 'vent': 'off',
                 'ventilatorMinOnTime': 5}],
  'actualTemperature': 720,
  'desiredCool': 734,
  'desiredHeat': 707,
  'fanMinOnTime': 0,
  'humidity': '36',
  'hvacMode': 'off'},
 {'Programs': {'type': 'custom', 'tz': 'UTC', 'units': None},
  'Status': {'type': 'list', 'tz': 'UTC', 'units': None},
  'Vacations': {'type': 'custom', 'tz': 'UTC', 'units': None},
  'actualTemperature': {'type': 'integer', 'tz': 'UTC', 'units': 'degF'},
  'coolHoldTemp': {'type': 'integer', 'tz': 'UTC', 'units': 'degF'},
  'desiredCool': {'type': 'integer', 'tz': 'UTC', 'units': 'degF'},
  'desiredHeat': {'type': 'integer',S 'tz': 'UTC', 'units': 'degF'},
  'fanMinOnTime': {'type': 'integer', 'tz': 'UTC', 'units': 'seconds'},
  'heatHoldTemp': {'type': 'integer', 'tz': 'UTC', 'units': 'degF'},
  'humidity': {'type': 'integer', 'tz': 'UTC', 'units': '%'},
  'hvacMode': {'type': 'bool', 'tz': 'UTC', 'units': 'seconds'}}]
Individual points can be obtained via JSON RPC on the VOLTTRON Platform. In an agent:
self.vip.rpc.call("platform.driver", "get_point", <device topic>, <kwargs>)
Set_point Conventions
Note
Examples from this section are from Ecobee’s documentation.
The Ecobee Web API requires a variety of objects to be supplied for the various functionalities: setting a hold, adding a vacation and adding a program require creating a JSON object. Each object is described in its corresponding section below.
To set points using the Ecobee driver, it is recommended to use the actuator agent. If you are not familiar with the Actuator, read the documentation and check out the example agent code at examples/CSVDriver/CsvDriverAgent/agent.py in the VOLTTRON repository.
Setting an Ecobee “Setting”
Ecobee “Settings” points are simple points which are similar to a typical set point. Many settings are boolean values for basic Ecobee configuration settings (such as whether the temperature should be in degrees Celsius or Fahrenheit). Setting a “Setting” point is as simple as making an RPC request to the Actuator’s set_point method with a supplied point name and desired setting. Consider a “setting” point useCelsius; use the following code to send a set_point RPC request:
self.vip.rpc.call('platform.actuator', 'devices/campus/building/ecobee/useCelsius', True)
Setting a Hold
Setting a Hold requires creating a params JSON object for the hold, many holds require setting more than one value each. For example, setting a temperature hold requires setting the upper (coolHoldTemp) and lower (heatHoldTemp) bounds desired. Create a Hold params object and send it as the contents of a set_point RPC call to the Actuator.
Example Hold params object:
{
    "holdType":"nextTransition",
    "heatHoldTemp":680,
    "coolHoldTemp":720
}
Body of the HTTP request sent by the driver to Ecobee’s Web API:
{
    "selection": {
        "selectionType": "thermostats",
        "selectionMatch": "<ecobee id>"
    },
    "functions": [
        {
            "type": "setHold",
            "params": {
                # user-specified params object
            }
        }
    ]
}
Note
In a heat/coolHoldTemp hold, holdType, heatHoldTemp, and coolHoldTemp values are all required by the
Ecobee web API. In this case, the holdType describes how the hold should be applied, the heatHoldTemp is the
lower temperature bound for the hold, and the coolHoldTemp is the upper temperature bound.
RPC request to the actuator:
self.vip.rpc.call('platform.actuator', 'devices/campus/building/ecobee/heatHoldTemp', True)
Note
In Ecobee data, a Hold set by the user is sometimes denoted as “desired<point>” and the sensor reading for the held value as “actual<point>”. For example, a Hold set by a user called heatHoldTemp can be found in Ecobee publishes as desiredHeat and the actual temperature reading as actualTemperature.
Ecobee’s documentation on Hold objects can be found here:
Adding and Deleting a Vacation
To add a vacation, call the set_point JSON-RPC method of the Actuator, providing the vacation parameters object required by Ecobee along with the Vacation point. The params object is sent inside a create vacation object sent to the web API:
{
      "selection": {
            "selectionType":"registered",
            "selectionMatch":""
      },
      "functions": [
            {
                  "type":"createVacation",
                  "params":{
                        # user-specified params object
                  }
            }
      ]
}
It is possible to supply complex objects including values for fans, vents, occupation status, etc. but a basic vacation requires only a name, cool and heat hold temperatures, start and end dates with start and end times. Example:
{
    "name": "Skiing",
    "coolHoldTemp": 780,
    "heatHoldTemp": 660,
    "startDate": "2016-03-15",
    "startTime": "20:00:00",
    "endDate": "2016-03-29",
    "endTime": "08:00:00"
  }
Providing a params object which does not contain these required values will result in the driver throwing an error.
Example set_point RPC call for Vacation:
self.vip.rpc.call('platform.actuator', 'set_point', 'devices/campus/building/ecobee/Vacation', params)
It is also possible to delete a stored vacation object. To do so, supply the vacation name specified in the params object with the delete keyword set to True.
self.vip.rpc.call('platform.actuator', 'set_point',
                  'devices/campus/building/ecobee/Vacation', "Skiing", True)
A more in-depth example of using the Ecobee web API endpoint for setting a vacation can be found here: https://www.ecobee.com/home/developer/api/examples/ex9.shtml
Adding a Program
Programs can also be added using the Ecobee driver. To add a program, the user should supply an Ecobee program object in the set_point JSON-RPC request:
{
      "selection": {
            "selectionType":"registered",
            "selectionMatch":""
      },
      "thermostat": {
            "program": {
                <program object here>
            }
      }
}
Program objects consist of a list of “climate” objects and “schedule” objects. Climate objects specify the climate settings which correspond to a climate name (for example, a “Warm” climate may be set for a high heat and cool hold temp). Schedule objects list the desired climate settings for every half hour of the day (48 total) for 7 days, each referring to a climate name.
Example climate:
{
   "name": "Warm",
   "isOccupied": true,
   "isOptimized": false,
   "coolFan": "auto",
   "heatFan": "auto",
   "vent": "off",
   "ventilatorMinOnTime": 20,
   "owner": "system",
   "type": "program",
   "coolTemp": 752,
   "heatTemp": 740
}
Example Schedule:
[
      [
        "sleep",
        "sleep",
        "sleep",
        "sleep",
        "home",
        "home",
        "home",
        ...
      ],
      ...
]
Program Body:
{
    "schedule": [
      [
        "sleep",
        "sleep",
        ...
        "home",
        "sleep"
      ],
      ...
    ],
    "climates": [
        {
           "name": "Sleep",
           "climateRef": "sleep",
           "isOccupied": true,
           "isOptimized": false,
           "coolFan": "auto",
           "heatFan": "auto",
           "vent": "off",
           "ventilatorMinOnTime": 20,
           "owner": "system",
           "type": "program",
           "colour": 2179683,
           "coolTemp": 752,
           "heatTemp": 662
        },
        ...
    ]
}
Example set_point RPC call for Program:
self.vip.rpc.call('platform.actuator', 'set_point', 'devices/campus/building/ecobee/Vacation', program_body)
If the user would like to resume the existing program instead, it is possible to specify None for the program body
with the keyword resume_all set to True.
Example set_point RPC call to resume the Program:
self.vip.rpc.call('platform.actuator', 'set_point',
                  'devices/campus/building/ecobee/Vacation', None, True)
A more in-depth example describing the objects required by the Ecobee web API endpoint for setting a program can be found here: https://www.ecobee.com/home/developer/api/examples/ex11.shtml
Status
The Status point is a read-only register supplying the running status of the HVAC systems the thermostat is interfacing with. set_point is not available for this point; set_point RPC calls for this point will raise a NotImplementedError exception.
Versioning
The Ecobee driver has been tested using the May 2019 API release as well as device firmware version 4.5.73.24