Writing Agent Tests
The VOLTTRON team strongly encourages developing agents with a set of unit and integration tests. Test-driven development can save developers significant time and effort by clearly defining behavioral expectations for agent code. We recommend developing agent tests using Pytest. Agent code contributed to VOLTTRON is expected to include a set of tests using Pytest in the agent module directory. Following are instructions for setting up Pytest, structuring your tests, how to write unit and integration tests (including some helpful tools using Pytest and Mock) and how to run your tests.
Installation
To get started with Pytest, install it in an activated environment:
pip install pytest
Or when running VOLTTRON’s bootstrap process, specify the –testing optional argument.
python bootstrap.py --testing
Module Structure
We suggest the following structure for your agent module:
├── UserAgent
│   ├── user_agent
│   │   ├── data
│   │   │   └── user_agent_data.csv
│   │   ├── __init__.py
│   │   └── agent.py
│   ├── tests
│   │   └── test_user_agent.py
│   ├── README.md
│   ├── config.json
│   ├── contest.py
│   ├── requirements.txt
│   └── setup.py
The test suite should be in a tests directory in the root agent directory, and should contain one or more test code files (with the test_<name of test> convention). Conftest.py can be used to give all agent tests access to some portion of the VOLTTRON code - in many cases agents use conftest to import VOLTTRON testing fixtures for integration tests.
Naming Conventions
Pytest tests are discovered and run using some conventions:
- Tests will be found recursively in either the directory specified when running Pytest, or the current working directory if no argument was supplied
- Pytest will search in those directories for files called test_<name of test>.py or <name of test>_test.py
- In those files, Pytest will test:
- functions and methods prefixed by “test” outside of any class
- functions and methonds prefixed by “test” inside of any class prefixed by “test”
├── TestDir
│   ├── MoreTests
│   │   ├── test2.py
│   ├── test1.py
│   └── file.py
# test1.py

def helper_method():
    return 1

def test_success():
    assert helper_method()

# test2.py

def test_success():
    assert True

def test_fail():
    assert False

# file.py

def test_success():
    assert True

def test_fail():
    assert False
In the above example, Pytest will run the tests test_success from the file test1.py and test_success and test_fail from test2.py. No tests will be run from file.txt, even though it contains test code, nor will it try to run helper_method from test1.py as a test.
Writing Unit Tests
These tests should test the various methods of the code base, checking for success and fail conditions. These tests should capture how the components of the system should function - tests should describe all the possible output conditions given the possible range of inputs including how they should fail if given improper input.
VOLTTRON agents include code for many platform features, these features can be mocked to allow unit tests to test only the features of the agent, without having to account for the behaviors of the core platform:
# Import the Pytest, Mock, base Agent, and Agent mock utility from VOLTTRON's repository
import pytest
import mock
from volttron.platform.vip.agent import Agent
from volttrontesting.utils.utils import AgentMock
# Import your agent code
from UserAgent import UserAgentClass

UserAgentClass.__bases__ = (AgentMock.imitate(Agent, Agent()),)
agent = UserAgentClass()

def test_success_case():
    result = agent.do_function("valid input")
    assert isinstance(result, dict)
    for key in ['test1', 'test2']:
        assert key in result
    assert result.get("test1") == 10
    assert isinstance(result.get("test2"), str)
    # ...

def test_failure_case()
    # pytests.raises can be useful for testing exceptions, more information about usage below
    with pytest.raises(ValueError, match=r'Invalid input string for do_function')
        result = agent.do_function("invalid input")
Pytest Tools
Pytest includes many helpful tools for developing your tests, here we’ll highlight a few that have been useful for VOLTTRON core tests, but checkout the Pytest documentation for additional information on each tool as well as tools not covered in this guide.
Pytest Fixtures
Pytest fixtures can be used to create reusable code for tests that can be accessed by every test in a module based on scope. There are several kinds of scopes, but commonly used are “module” (the fixture is run once per module for all the tests of that module) or “function” (the fixture is run once per test). For fixtures to be used by tests, they should be passed as parameters.
Here is an example of a fixture, along with using it in a test:
# Fixtures with scope function will be run once per test if the test accepts the fixture as a parameter
@pytest.fixture(scope="function")
def cleanup_database():
    # This fixture cleans up a sqlite database in between each test run
    sqlite_conn = sqlite.connect("test.sqlite")
    cursor = sqlite_conn.cursor()
    cursor.execute("DROP TABLE 'TEST'")
    cursor.commit()

    cursor.execute("CREATE TABLE TEST (ID INTEGER, FirstName TEXT, LastName TEXT, Occupation Text)")
    cursor.commit()
    sqlite.conn.close()

# now when we pass the cleanup function, we should expect that the table will be dropped and rebuilt before the test
# runs
def test_store_data(cleanup_database):
    sqlite_conn = sqlite.connect("test.sqlite")
    cursor = sqlite_conn.cursor()
    # after this insert, we'd expect to only have 1 value in the table
    cursor.execute("INSERT INTO TEST VALUES(1, 'Test', 'User', 'Developer')")
    cursor.commit()

    # validate the row count
    cursor.execute("SELECT COUNT(*) FROM TEST")
    count = cursor.fetchone()
    assert count == 1
Pytest.mark
Pytest marks are used to set metadata for test functions. Defining your own custom marks can allow you to run subsections of your tests. Parametrize can be used to pass a series of parameters to a test, so that it can be run many times to cover the space of potential inputs. Marks also exist to specify expected behavior for tests.
Custom Marks
To add a custom mark, add the name of the mark followed by a colon then a description string to the ‘markers’ section of Pytest.ini (an example of this exists in the core VOLTTRON repository). Then add the appropriate decorator:
@pytest.mark.UserAgent
def test_success_case():
    # TODO unit test here
    pass
The VOLTTRON team also has a dev mark for running individual (or a few) one-off tests.
@pytest.mark.dev
@pytest.mark.UserAgent
def test_success_case():
    # TODO unit test here
    pass
Parametrize
Parametrize will allow tests to be run with a variety of parameters. Add the parametrize decorator, and for parameters include a list of parameter names matching the test parameter names as a comma-delimited string followed by a list of tuples containing parameters for each test.
@pytest.mark.parametrize("param1,param2,param3", [(1, 2, 3), (-1, 0, "")])
def test_user_agent(param1, param2, param3):
    # TODO unit test here
    pass
Skip, skipif, and xfail
The skip mark can be used to skip a test for any reason every time the test suite is run:
# This test will be skipped!
@pytest.mark.skip
def test_user_agent():
    # TODO unit test here
    pass
The skipif mark can be used to skip a test based on some condition:
# This test will be skipped if RabbitMQ hasn't been set up yet!
@pytest.mark.skipif(not isRabbitMQInstalled)
def test_user_agent():
    # TODO unit test here
    pass
The xfail mark can be used to run a test, but to show that the test is currently expected to fail
# This test will fail, but will not cause the module tests to be considered failing!
@pytest.mark.xfail
def test_user_agent():
    # TODO unit test here
    assert False
Mock
Mock allows a user to replace the behavior of dependencies with a user specified behavior. This is useful for replacing VOLTTRON platform behavior, remote API behavior, modules, etc. where using them in unit or integration tests is impractical or impossible.
class UserAgent()

    def __init__():
        # Code here

    def get_remote_data()
        response = self._get_data_from_remote()
        return "Remote response: {}".format(response)

    # it can be useful to create private functions for use with mock for things like making web requests
    def _get_data_from_remote():
        url = "test.com/test1"
        headers = {}
        return requests.get(url, headers)

# ~~~~~~~~~~~~~~~~~~~~~~~~~~~~~~~~~~~~~~~~~~~~~~~~~~~~

import pytest
import mock

def get_mock_response():
    return "test response"

# here we're mocking the UserAgent's _get_data_from_remote method and replacing it with our get_mock_response method
# to feed our test some fake remote data
@mock.patch.object(UserAgent, '_get_data_from_remote', get_mock_response)
def test_get_remote_data():
       assert UserAgent.get_remote_Data() == "Remote response: test response"
Writing Integration Tests
Integration tests are useful for testing the faults that occur between integrated units. In the context of VOLTTRON agents, integration tests should test the interactions between the agent, the platform, and other agents installed on the platform that would interface with the agent. It is typical for integration tests to test configuration, behavior and content of RPC calls and agent Pub/Sub, the agent subsystems, etc.
Pytest best practices for Integration Testing
The Volttrontesting directory includes several helpful fixtures for your tests. Including the following line at the top of your tests, or in conftest.py, will allow you to utilize the platform wrapper fixtures, and more.
from volttrontesting.fixtures.volttron_platform_fixtures import *
Here is an example success case integration test:
import pytest
import mock
from volttrontesting.fixtures.volttron_platform_fixtures import *

# If the test requires user specified values, setting environment variables or having settings files is recommended
API_KEY = os.environ.get('API_KEY')

# request object is a pytest object for managing the context of the test
@pytest.fixture(scope="module")
def Weather(request, volttron_instance):
    config = {
        "API_KEY": API_KEY
    }
    # using the volttron_instance fixture (passed in by volttrontesting fixtures), we can install an agent
    # on the platform to test against
    agent = volttron_instance.install_agent(
        vip_identity=identity,
        agent_dir=source,
        start=False,
        config_file=config)

    volttron_instance.start_agent(agent)
    gevent.sleep(3)

    def stop_agent():
        print("stopping weather service")
        if volttron_instance.is_running():
            volttron_instance.stop_agent(agent)
    # here we used the passed request object to add something to happen when the test is finished
    request.addfinalizer(stop_agent)
    return agent, identity

# Here we create a really simple agent which has only the core functionality, which we can use for Pub/Sub
# or JSON/RPC
@pytest.fixture(scope="module")
def query_agent(request, volttron_instance):
    # Create the simple agent
    agent = volttron_instance.build_agent()

    def stop_agent():
        print("In teardown method of query_agent")
        agent.core.stop()

    request.addfinalizer(stop_agent)
    return agent

# pass the 2 fixtures to our test, then we can run the test
def test_weather_success(Weather, query_agent):
    query_data = query_agent.vip.rpc.call(identity, 'get_current_weather', locations).get(timeout=30)
    assert query_data.get("weather_results") = "Its sunny today!"
For more integration test examples, it is recommended to take a look at some of the VOLTTRON core agents, such as historian agents and weather service agents.
Running your Tests and Debugging
Pytest can be run from the command line to run a test module.
pytest <path to module to be tested>
If using marks, you can add “-m <mark>” to specify your testing subset, and -s can be used to surpress standard output. For more information about optional arguments you can type pytest –help into your command line interface to see the full list of options.
Testing output should look something like this:
(volttron) <user>@<host>:~/volttron$ pytest services/core/SQLHistorian/
======================================================== test session starts =========================================================
platform linux -- Python 3.6.9, pytest-5.4.1, py-1.8.1, pluggy-0.13.1 -- /home/<user>/volttron/env/bin/python
cachedir: .pytest_cache
rootdir: /home/<user>/volttron, inifile: pytest.ini
plugins: timeout-1.3.4
timeout: 240.0s
timeout method: signal
timeout func_only: False
collected 2 items

services/core/SQLHistorian/tests/test_sqlitehistorian.py::test_sqlite_timeout[volttron_3-volttron_instance0] ERROR             [ 50%]
services/core/SQLHistorian/tests/test_sqlitehistorian.py::test_sqlite_timeout[volttron_3-volttron_instance1] PASSED            [100%]

=============================================================== ERRORS ===============================================================
________________________________ ERROR at setup of test_sqlite_timeout[volttron_3-volttron_instance0] ________________________________

request = <SubRequest 'volttron_instance' for <Function test_sqlite_timeout[volttron_3-volttron_instance0]>>, kwargs = {}
address = 'tcp://127.0.0.113:5846'

    @pytest.fixture(scope="module",
                    params=[
                        dict(messagebus='zmq', ssl_auth=False),
                        pytest.param(dict(messagebus='rmq', ssl_auth=True), marks=rmq_skipif),
                    ])
    def volttron_instance(request, **kwargs):
        """Fixture that returns a single instance of volttron platform for testing

        @param request: pytest request object
        @return: volttron platform instance
        """
        address = kwargs.pop("vip_address", get_rand_vip())
        wrapper = build_wrapper(address,
                                messagebus=request.param['messagebus'],
                                ssl_auth=request.param['ssl_auth'],
>                               **kwargs)

address    = 'tcp://127.0.0.113:5846'
kwargs     = {}
request    = <SubRequest 'volttron_instance' for <Function test_sqlite_timeout[volttron_3-volttron_instance0]>>

volttrontesting/fixtures/volttron_platform_fixtures.py:106:
Running Tests Via PyCharm
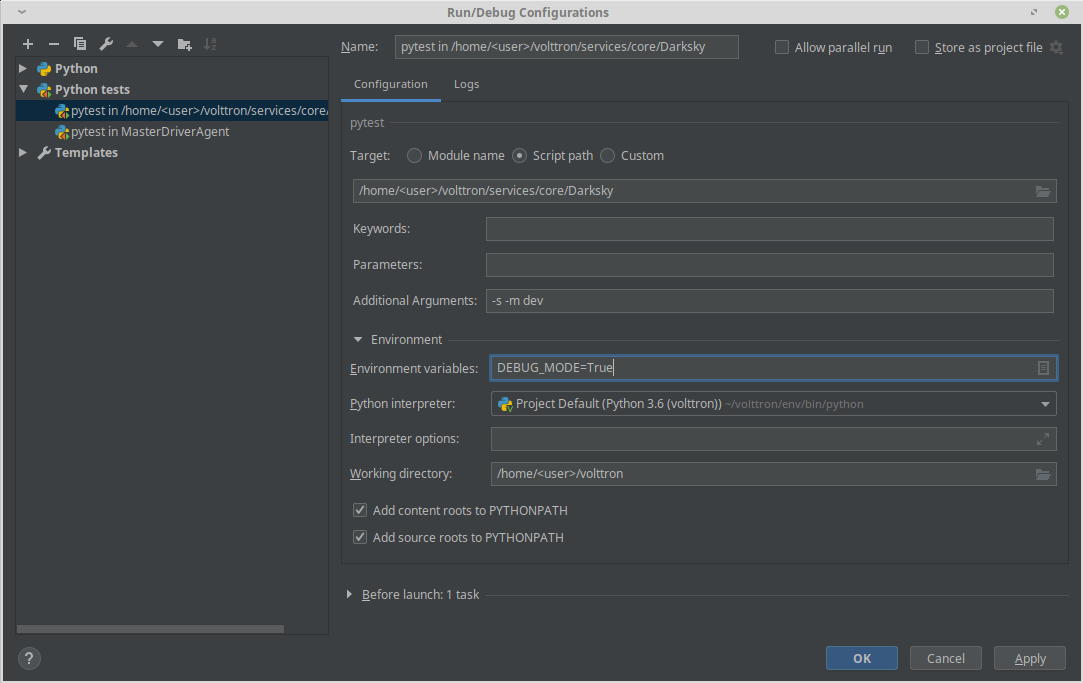
To run our Pytests using PyCharm, we’ll need to create a run configuration. To do so, select “edit configurations” from the “Run” menu (or if using the toolbar UI element you can click on the run configurations dropdown to select “edit configurations”). Use the plus symbol at the top right of the pop-up menu, scroll to “Python Tests” and expand this menu and select “pytest”. This will create a run configuration, which will then need to be filled out. We recommend the following in general:
- Set the “Script Path” radio and fill the form with the path to your module. Pytest will run any tests in that module using the discovery process described above (and any marks if specified)
- In the interpreter dropdown, select the VOLTTRON virtual environment - this will likely be your project default
- Set the working directory to the VOLTTRON root directory
- Add any environment variables - For debugging, add variable “DEBUG_MODE” = True or “DEBUG” 1
- Add any optional arguments (-s will prevent standard output from being displayed in the console window, -m is used to specify a mark)