Multi-Platform Connection Walkthrough
Multi-Platform message bus communication alleviates the need for an agent in one platform to connect to another platform directly in order for it to send/receive messages from the other platform. With multi-platform communication, connections to external platforms will be maintained by the platforms itself and agents do not have the burden to manage the connections directly. This guide will show how to connect three VOLTTRON instances with a fake driver running on VOLTTRON instance 1 publishing to topic with prefix=”devices” and listener agents running on other 2 VOLTTRON instances subscribed to topic “devices”.
- Getting Started
- Multi-Platform Configuration
- Configuration and Authentication in Setup Mode
- Setup Configuration and Authentication Manually
- Start Master driver on VOLTTRON instance 1
- Start Listener agents on VOLTTRON instance 2 and 3
- Stopping All the Platforms
Getting Started
Modify the subscribe annotate method parameters in the listener agent (examples/ListenerAgent/listener/agent.py in
the VOLTTRON root directory) to include all_platforms=True parameter
to receive messages from external platforms.
@PubSub.subscribe('pubsub', '')
to
@PubSub.subscribe('pubsub', 'devices', all_platforms=True)
or add below line in the onstart method
self.vip.pubsub.subscribe('pubsub', 'devices', self.on_match, all_platforms=True)
Note
If using the onstart method remove the @PubSub.subscribe(‘pubsub’, ‘’) from the top of the method.
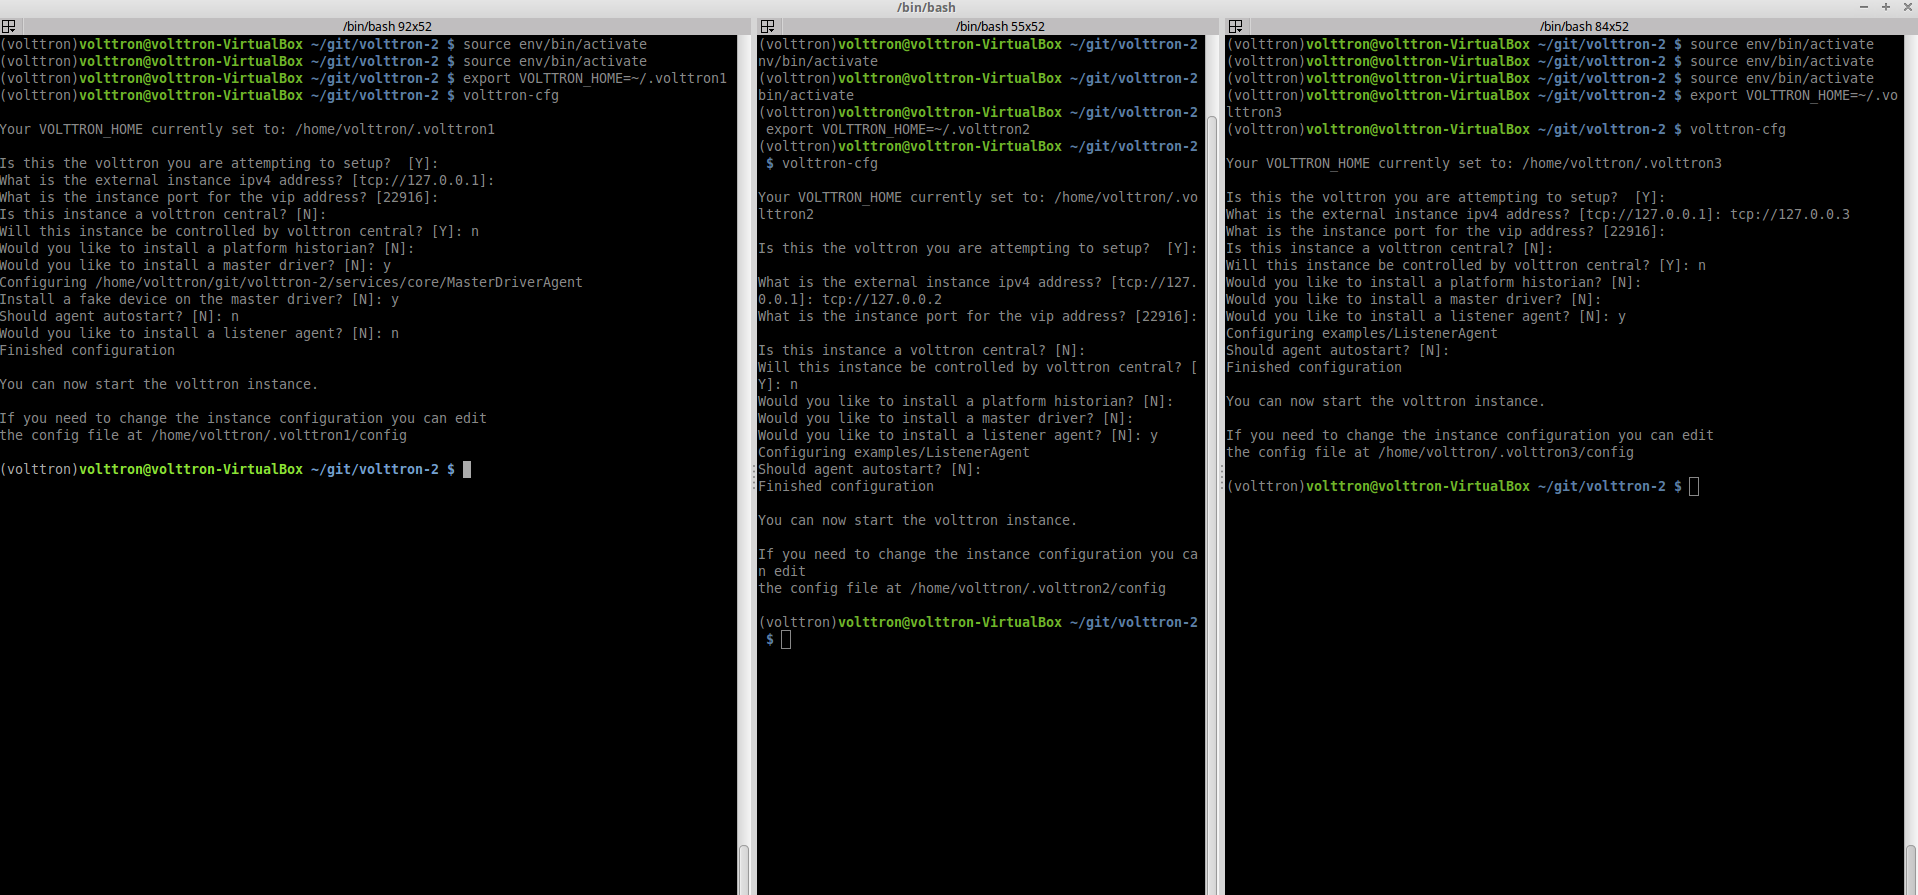
After building VOLTTRON, open three shells with the current directory the root of the VOLTTRON repository. Then activate the VOLTTRON environment and export the VOLTTRON_HOME variable. The home variable needs to be different for each instance.
$ source env/bin/activate
$ export VOLTTRON_HOME=~/.volttron1
Run volttron-cfg in all the three shells. This command will ask how the instance should be set up. Many of the options have defaults and that will be sufficient. Enter a different VIP address for each platform. Configure fake master driver in the first shell and listener agent in second and third shell.
Multi-Platform Configuration
For each instance, specify the instance name in platform config file under it’s VOLTTRON_HOME directory.
If the platform supports web server, add the bind-web-address as well.
Here is an example,
Path of the config: $VOLTTRON_HOME/config
[volttron]
vip-address = tcp://127.0.0.1:22916
instance-name = "platform1"
bind-web-address = http://127.0.0.1:8080
Instance name and bind web address entries added into each VOLTTRON platform’s config file is shown below.

Next, each instance needs to know the VIP address, platform name and server keys of the remote platforms that it is connecting to. In addition, each platform has to authenticate or accept the connecting instances’ public keys. We can do this step either by running VOLTTRON in setup mode or configure the information manually.
Configuration and Authentication in Setup Mode
Note
It is necessary for each platform to have a web server if running in setup mode
Add list of web addresses of remote platforms in $VOLTTRON_HOME/external_address.json

Start VOLTTRON instances in setup mode in the three terminal windows. The “-l” option in the following command tells VOLTTRON to log to a file. The file name should be different for each instance.
$ volttron -v -l l1.log --setup-mode&
Note
Don’t for get the ‘&’ on the end to put the process in the background.
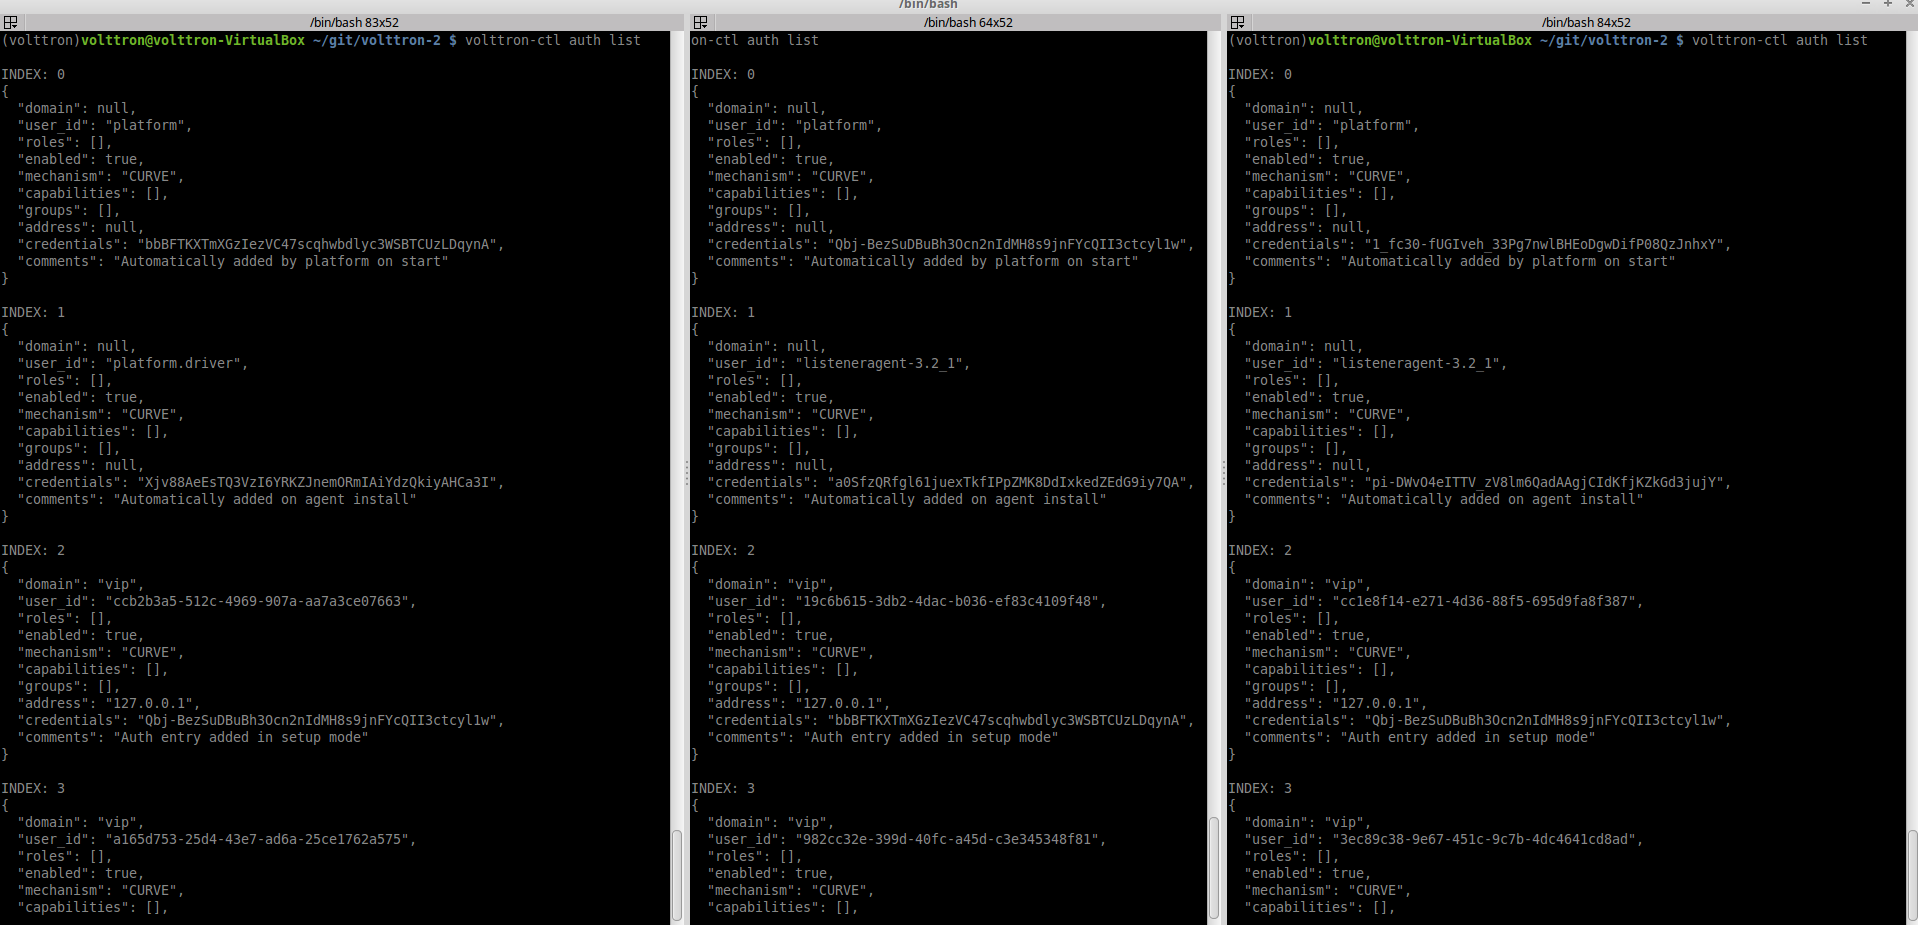
A new auth entry is added for each new platform connection. This can be checked with below command in each terminal window.
$ volttron-ctl auth list
After all the connections are authenticated, we can start the instances in normal mode.
$ volttron-ctl shutdown --platform
$ volttron -v -l l1.log&
Setup Configuration and Authentication Manually
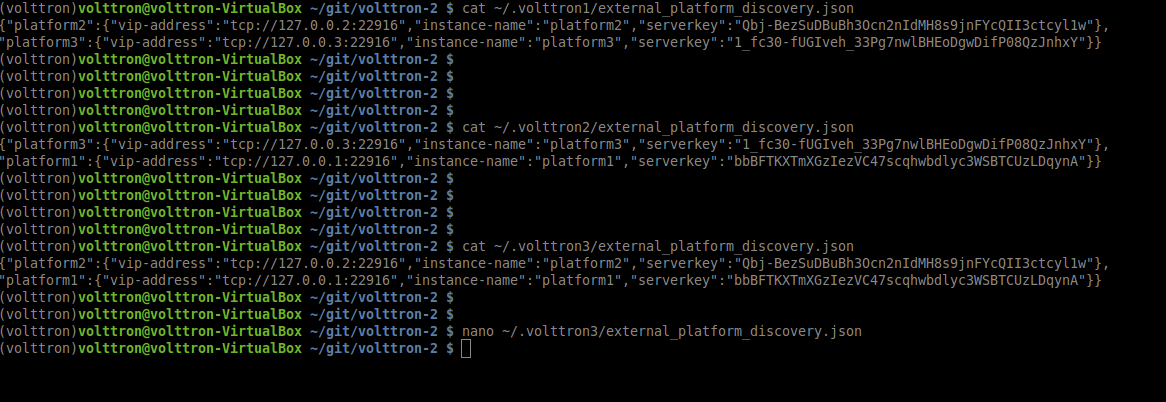
If you do not need web servers in your setup, then you will need to build the platform discovery config file manually. The config file should contain an entry containing VIP address, instance name and serverkey of each remote platform connection.
Name of the file: external_platform_discovery.json
Directory path: Each platform’s VOLTTRON_HOME directory.
For example, since VOLTTRON instance 1 is connecting to VOLTTRON instance 2 and 3, contents of
external_platform_discovery.json will be
{
    "platform2": {"vip-address":"tcp://127.0.0.2:22916",
                  "instance-name":"platform2",
                  "serverkey":"YFyIgXy2H7gIKC1x6uPMdDOB_i9lzfAPB1IgbxfXLGc"},
    "platform3": {"vip-address":"tcp://127.0.0.3:22916",
                  "instance-name":"platform3",
                  "serverkey":"hzU2bnlacAhZSaI0rI8a6XK_bqLSpA0JRK4jq8ttZxw"}
}
We can obtain the serverkey of each platform using below command in each terminal window:
$ volttron-ctl auth serverkey
Contents of external_platform_discovery.json of VOLTTRON instance 1, 2, 3 is shown below.
After this, you will need to add the server keys of the connecting platforms using the volttron-ctl utility. Type
volttron-ctl auth add command on the command prompt and simply hit Enter to select defaults on all fields
except credentials. Here, we can either add serverkey of connecting platform or type /.*/ to allow ALL
connections.
Warning
/.*/ allows ALL agent and platform connections without authentication.
$ volttron-ctl auth add
domain []:
address []:
user_id []:
capabilities (delimit multiple entries with comma) []:
roles (delimit multiple entries with comma) []:
groups (delimit multiple entries with comma) []:
mechanism [CURVE]:
credentials []: /.*/
comments []:
enabled [True]:
added entry domain=None, address=None, mechanism='CURVE', credentials=u'/.*/', user_id=None
For more information on authentication see authentication.
Once the initial configuration are setup, you can start all the VOLTTRON instances in normal mode.
$ volttron -v -l l1.log&
Next step is to start agents in each platform to observe the multi-platform PubSub communication behavior.
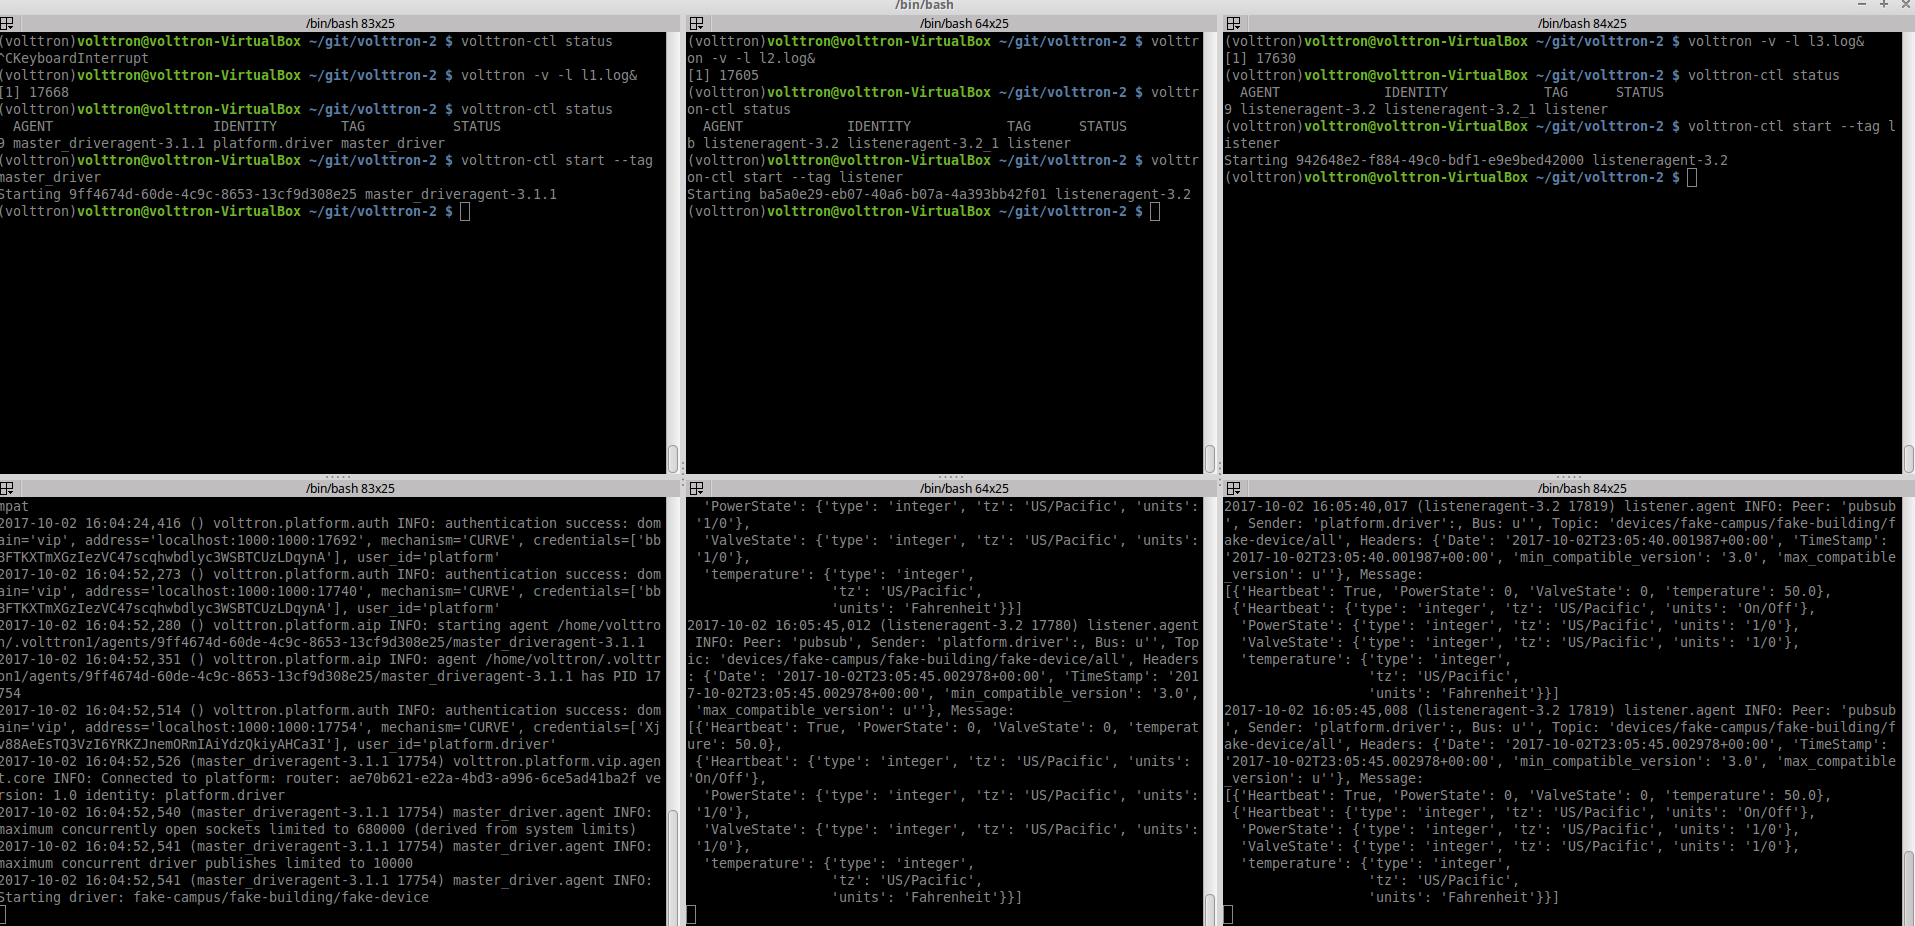
Start Master driver on VOLTTRON instance 1
If master driver is not configured to auto start when the instance starts up, we can start it explicitly with this command.
$ volttron-ctl start --tag master_driver
Start Listener agents on VOLTTRON instance 2 and 3
If the listener agent is not configured to auto start when the instance starts up, we can start it explicitly with this command.
$ volttron-ctl start --tag listener
We should start seeing messages with prefix=”devices” in the logs of VOLTTRON instances 2 and 3.
Stopping All the Platforms
We can stop all the VOLTTRON instances by executing below command in each terminal window.
$ volttron-ctl shutdown --platform